ListLens journal · Photography
How to Photograph Jewelry: A Practical Phone Guide
Learning how to photograph jewelry usually starts with a frustrating photo: the ring looks lovely on the table, but the camera sees a white patch where the stone should be. Or the chain is sharp at one end and blurry at the other. Before you buy more equipment or open an editor, fix the light, steady your phone and decide which details the buyer needs to see. Here’s a workable setup, followed by the checks worth making in ListLens.
By ListLens ·
The short answer
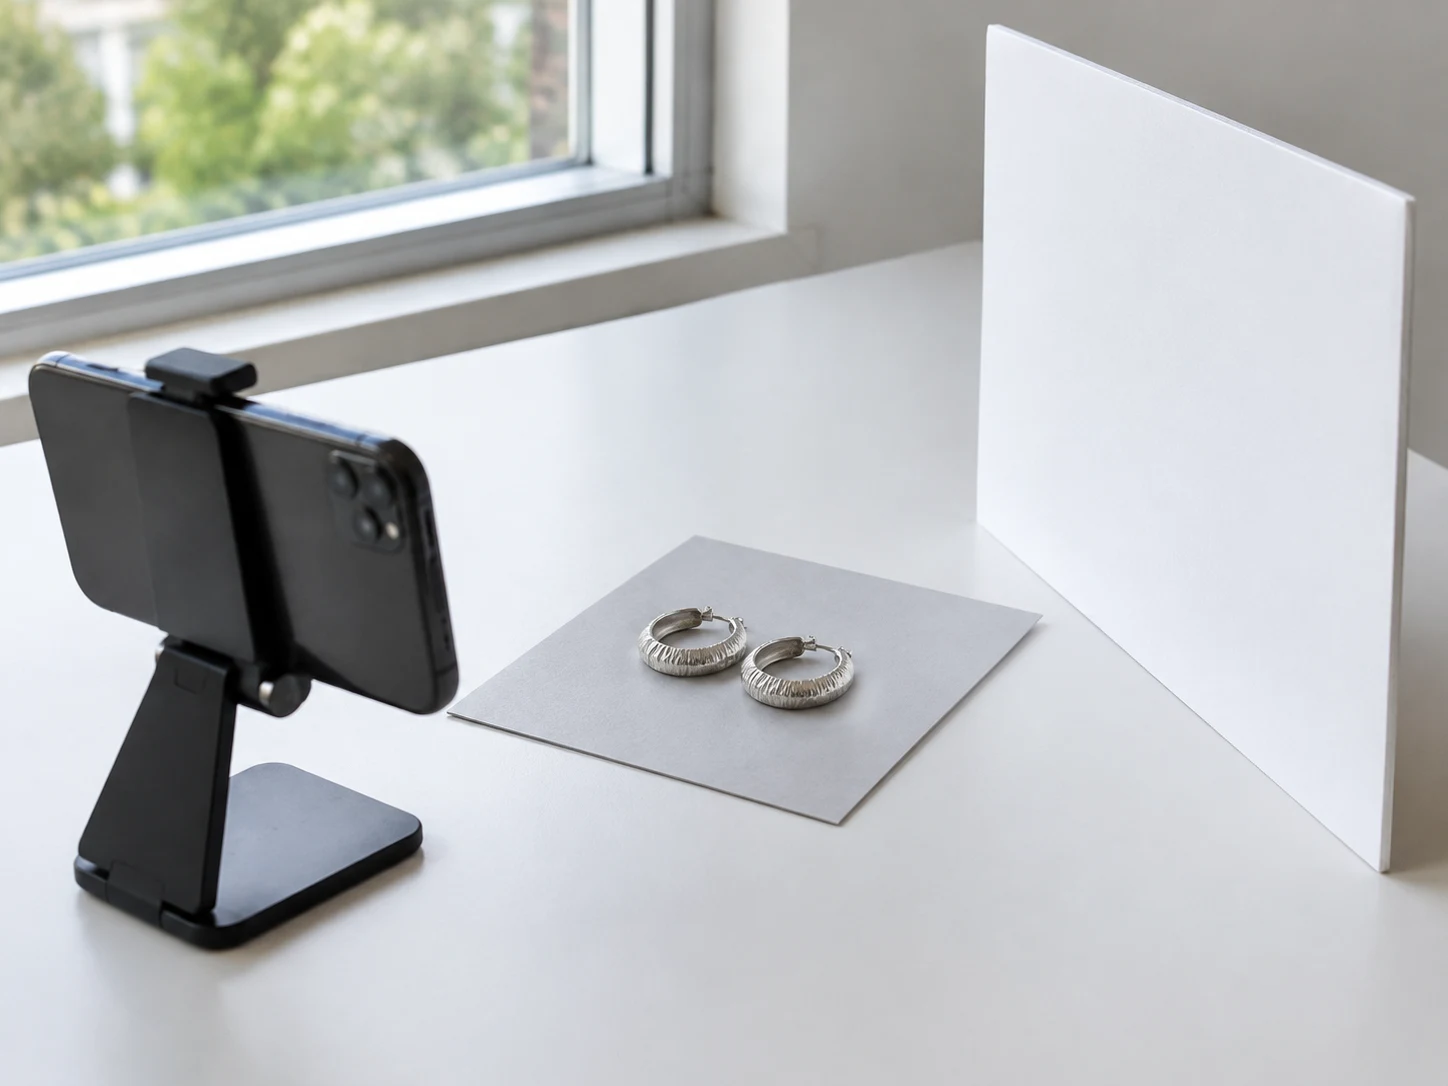
Put the jewellery beside a window with indirect light, on a plain matte surface. Place white card on the darker side, steady your phone and tap the important detail to focus. Take a full-piece photo, an angled view, a detail close-up and a scale shot. Check the originals at full size before editing anything.
You don’t need to make the metal reflection-free. You need reflections that show its shape without hiding the design.
1. Start with a clean piece and a simple table
Wipe your phone’s lens first. A fingerprint there can make the whole image look hazy, even when the jewellery is spotless. Remove loose dust from the piece using a clean, soft cloth suitable for its finish. Follow the maker’s care advice for delicate stones, coatings and antique pieces; don’t use a cleaning chemical just for a photograph.
Try white or light-grey matte card for your first background. A silver chain may need a slightly darker surface so its edges don’t disappear. Keep patterned fabric and shiny props out of this first shot. You can style a second image later; this one should let the buyer inspect what you’re selling.
A window, two pieces of card and a stable phone support are enough to start. GIA’s gem and jewellery photography guide also recommends cleaning the piece, stabilising the camera and checking focus before shooting.
2. Use soft light, not more light
Direct sun often creates a small, fierce highlight on polished metal. Move the table out of the sunbeam, or use a sheer curtain to soften daylight. Place white card opposite the window and watch what happens to the shadow side of the ring as you move the card closer.
Turn off nearby lamps if they give the scene a different colour. A warm ceiling light mixed with cooler daylight can leave one side of a silver piece yellow and the other blue. Start with one light source so you have fewer things to correct.
Take a test photo before arranging your whole collection. If the highlight covers the prongs or washes out a stone, change the light or angle now. A bright patch with no captured detail is not something an editor can reliably recover.
3. Get sharp details with your phone
Use the main camera as a starting point and turn off portrait-mode blur. That blur can soften chain links or treat an open setting as background. Rest the phone on a stand or a secure support, then use the timer to avoid shaking it as you press the shutter.
Tap the stone, setting or clasp to focus. If your phone allows exposure adjustment, lower it a little when bright areas lose their detail. Don’t darken everything just to tame one reflection: move the light first.
If the camera won’t focus close up, move back until it does. Crop afterwards rather than keeping a blurry close-up. Digital zoom makes the piece bigger on screen, but doesn’t recover detail the camera never captured.
Check the image at full size. Can you distinguish the prongs? Is the clasp readable? If a ring’s front is sharp but the band is soft, take a separate band photo or try a less steep angle. One photo does not have to explain every part of the piece.
How to remove glare from jewellery photos
First, work out what the jewellery is reflecting. A white rectangle may be your window. A pink tint may be your sleeve. A dark patch may be your phone or your own outline. Polished metal records its surroundings, so changing those surroundings often helps more than moving an editing slider.
- A hard white stripe hides the engraving: soften the light and rotate the piece slightly until the mark is visible.
- The metal reflects a coloured object: move it out of the setup and use neutral card near the piece.
- The stone looks completely white: change the camera or light angle and reduce exposure if needed. Check that you can still see the facets.
- The metal looks dull and flat: you may have softened everything too much. Move the card away slightly to bring back some light-and-dark contrast.
Don’t remove every highlight. A silver bangle needs a bright edge and a darker reflection to read as curved metal. For coloured gemstones, compare with the real piece under the same light: remove distracting colour casts without turning a naturally blue sapphire grey.
4. Take the views a buyer actually needs
A striking first image gets attention, but the rest of the set should answer questions. Start with these four views:
- The whole piece: leave space around the edges so a listing crop won’t cut off a chain or earring hook.
- A three-quarter view: show the depth of a setting, the thickness of a band or the way a pendant sits.
- A useful close-up: show the clasp, engraving, hallmark or stone setting—not just another version of the first image.
- A scale photo: show the piece worn or beside a clearly identified reference, and give the actual measurements in the listing.
For earrings, include the pair and the backs. For necklaces, show the pendant and the chain fastening. Flexible bracelets need a different arrangement from rings; our bracelet photography guide covers curved flat lays, upright shapes and clasp views.
Photograph wear or damage clearly when it matters to the sale. A scratch is not a lighting mistake, and removing it would give the buyer a different impression of the item.
5. Keep a repeatable setup for the next collection
Once one piece looks right, note where the phone, background and cards sit. Keep that arrangement for the next few pieces, but check each one: a polished bangle and a textured pendant won’t reflect the same light in the same way.
Use consistent framing and leave enough room for different marketplace crops. Keep the original files alongside your finished versions. If you later notice a missing link or a changed stone colour, you’ll have something reliable to compare against.
Where editing helps—and where to stop
Crop, straighten and correct an obvious colour cast before deciding whether the photo needs more work. Background dust can be tidied. The shape of the setting, stone count, engraving and condition should stay as they are. Our jewellery photo editing guide explains what to fix and what to leave alone.
ListLens lets you upload a jewellery photo, adjust lighting and material-colour settings, then compare the finished result with the original using the before-and-after slider and inspection zoom. Start with the original background; try staging only when you want a separate styled image.
An AI result still needs checking. Inspect the prongs, chain links, clasp and lettering before downloading. If a detail has changed, don’t publish that version. A plainer image of the right piece is better than a polished image of the wrong one.
You can try three free ListLens renders per account with no card required. After those, plans start at $15/month USD for 30 renders, plus applicable tax. Create a ListLens account when you have a clear original photo ready.
Common questions
Can I photograph jewellery without a light box?
Yes. Indirect window light, a matte background and white card are a sensible starting point. A light box can help control the surroundings, but it won’t fix missed focus or an angle that hides the clasp.
Should every jewellery photo have a white background?
No. Use a background that makes the piece easy to inspect, and check the requirements of the marketplace where you’ll publish it. Keep at least one clear, uncluttered product view even if your other images are styled.
Why does my gold jewellery look orange?
Check for warm lamps and coloured objects near the piece before changing its colour in an editor. Photograph under one neutral light source and compare with the actual jewellery. Don’t turn rose gold yellow just because you prefer the look.
Can AI fix an out-of-focus jewellery photo?
It may make the image look sharper, but it can also invent details. Retake an important blurry shot whenever possible, especially if it needs to show a hallmark, engraving or fine setting.